Your Chair is Aging You Faster. Here’s The One Exercise That Neutralizes The Damage (Must Try This!)

Your spine curves 2 degrees forward for every hour you sit—by lunch, you’ve aged your back by months. That tight knot between your shoulder blades isn’t just from stress. Your head pushing forward isn’t just bad posture. These are signs that sitting is literally reshaping your body.
You feel it every day. The ache when you stand up from your desk. The way you have to crack your neck multiple times before noon. The round shoulders that make you look older in photos. This isn’t normal wear and tear from getting older. This is sitting damage, and it’s happening faster than you think.
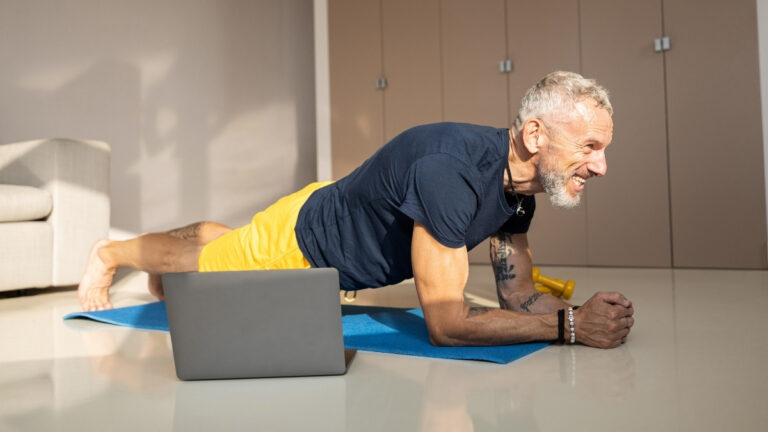
Most people try to fix this with expensive chairs or standing desks. Others stretch randomly throughout the day. But there’s one specific chair exercise for posture that targets the exact muscles sitting destroys. It takes 2 minutes and can be done anywhere you find a wall.
The best part? You don’t need to change your entire routine. You don’t need special equipment or a gym membership. Most sitting posture exercises only fix one problem at a time. This one fixes them all at once. It opens your tight chest, strengthens your weak back, and reminds your glutes how to work.
Here’s what you’ll learn. The hidden damage sitting does to your spine (it’s worse than you think). The exact exercise that reverses this damage in just 2 minutes. And the simple daily system that makes it automatic so you actually stick with it.
By the end of this article, you’ll have everything you need to stop sitting from aging you faster. Your back will thank you, your posture will improve, and you’ll feel years younger. All from one simple exercise you can start doing today.
The Hidden Cost of Your 9-to-5: How Sitting Ages Your Body
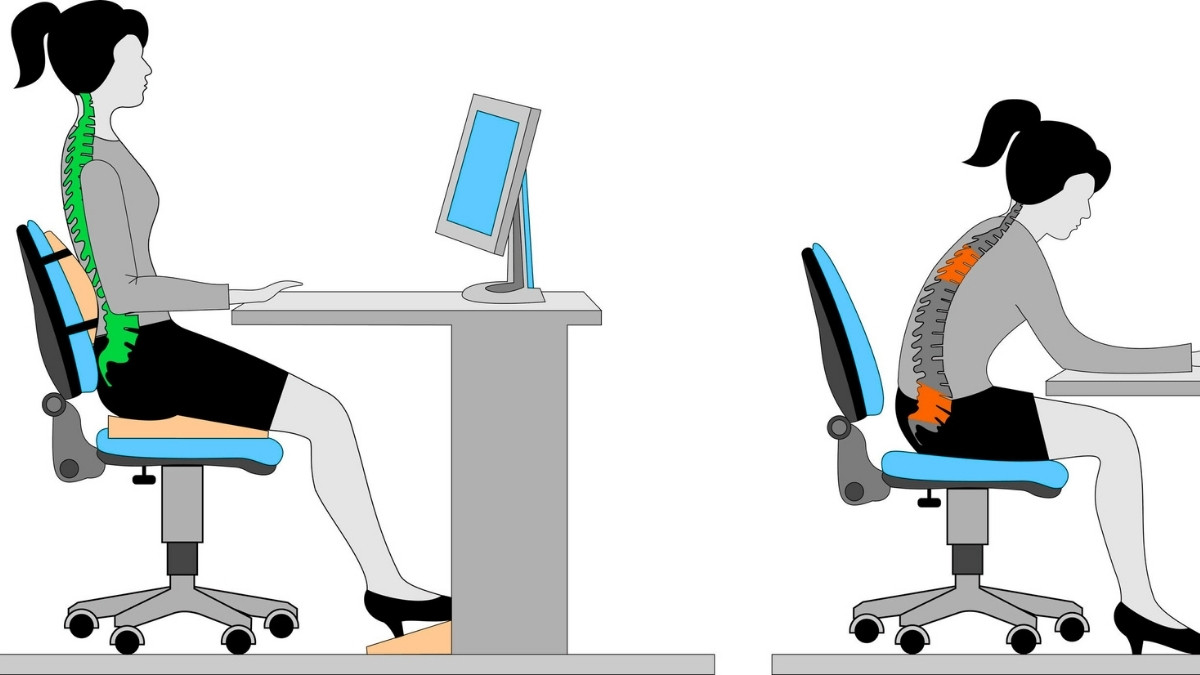
Here’s what happens to your body the moment you sit down. Your spine takes on 40% more pressure than when you stand. That’s like adding a 50-pound weight to your back every single workday.
Americans now sit 13 hours daily on average, according to the American Heart Association. Your body wasn’t built for this. And it’s fighting back in ways that age you fast.

Your head starts moving forward within minutes. For every inch your head pushes ahead, your neck carries an extra 10 pounds of stress. Most office workers’ heads sit 2-3 inches forward by lunch. That’s 20-30 pounds of extra weight crushing your neck muscles.
But the damage goes deeper than your neck. Your hip muscles start shortening after just 30 minutes of sitting. After 8 hours, they’ve tightened by 15%. This pulls your lower back into a painful arch. Your body tries to balance this by rounding your shoulders forward.
Here’s the worst part. Your glute muscles completely shut off after 30 minutes in a chair. These are the muscles that should support your back and keep you upright. When they stop working, everything else has to pick up the slack. Your lower back, neck, and shoulders start doing jobs they weren’t meant to do.

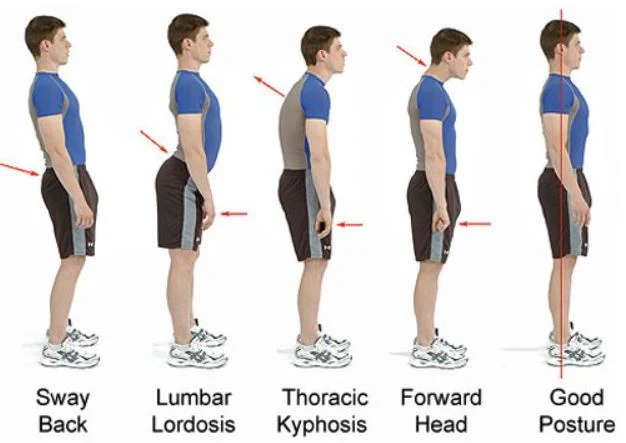
The GlobalSpine Care Initiative found that 54% of office workers now report chronic back pain. This isn’t just about feeling sore. Your body is actually changing shape. Your spine develops curves that shouldn’t be there. Doctors call this kyphosis – basically, your back becomes permanently hunched.
Your discs start breaking down too. These are the cushions between your spine bones. Sitting squashes them like old sponges. Over time, they crack and leak. This leads to nerve pain that shoots down your legs.
The muscle imbalances get worse every day. Your chest muscles get tight and short. Your back muscles get weak and long. Your body starts looking like the shape of your chair. And once these changes set in, they’re hard to reverse.
Think about how you felt at 20 versus how you feel now. That stiffness when you stand up? The ache in your neck by 3 PM? The way you need to stretch your back multiple times a day? This isn’t normal aging. It’s sitting aging.

But here’s the good news. You can stop this damage cycle with simple desk exercises for back pain. The right office worker stretches can actually reverse years of sitting damage. Your body wants to heal itself. You just need to give it the right signals.
The key is understanding that sitting damage happens in patterns. Your body adapts to whatever position you spend the most time in. Right now, that’s a hunched, compressed position. But you can teach it a new pattern. You can remind your muscles how to work properly again.
Most people try to fix this with expensive chairs or standing desks. Those help a little. But they don’t address the real problem – your muscles have forgotten how to hold you up correctly. You need to retrain them. And there’s one exercise that does exactly that.
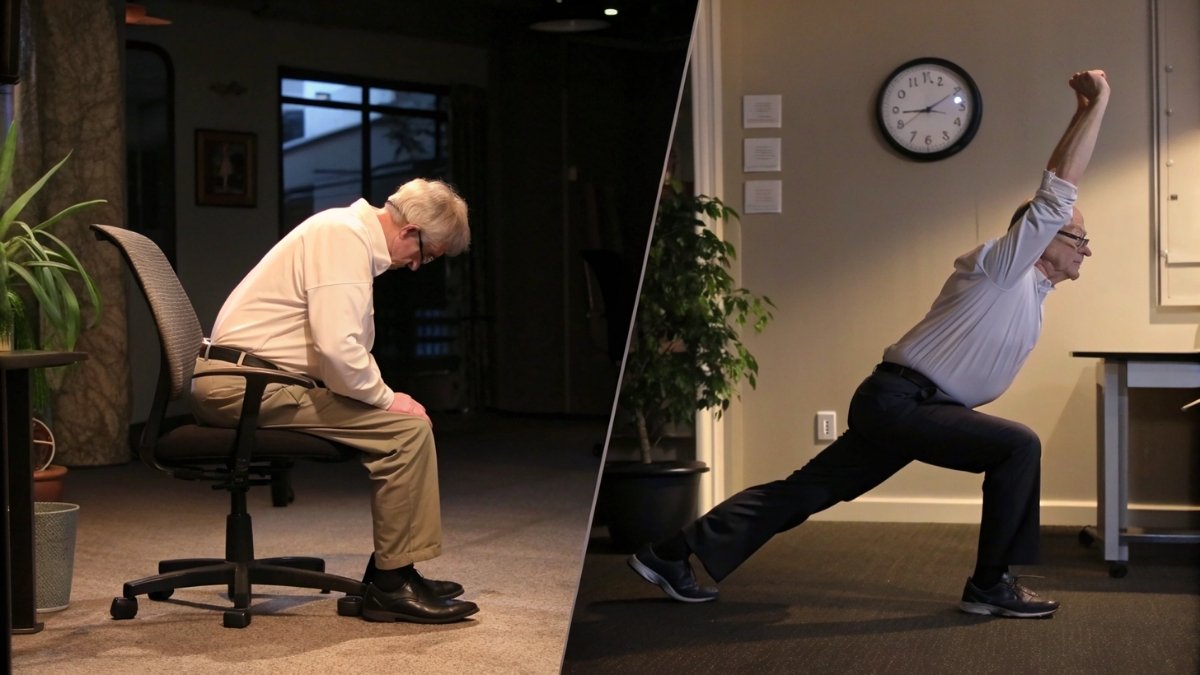
The Wall Angel: Your 2-Minute Posture Reset
Meet the wall angel – the chair exercise for posture that undoes everything sitting does to you. This one move targets every muscle that gets weak and tight from your desk job. And you can do it right now in your work clothes.
Here’s why this works so well. Most sitting posture exercises only fix one problem at a time. The wall angel fixes them all at once. It opens your chest, strengthens your back, and wakes up your glutes. All while teaching your head to sit where it belongs.
You don’t need equipment or a gym. Just find any wall and you’re ready to go. This makes it perfect for busy people who need results without adding another thing to their schedule.
The 8-Step Wall Angel Method
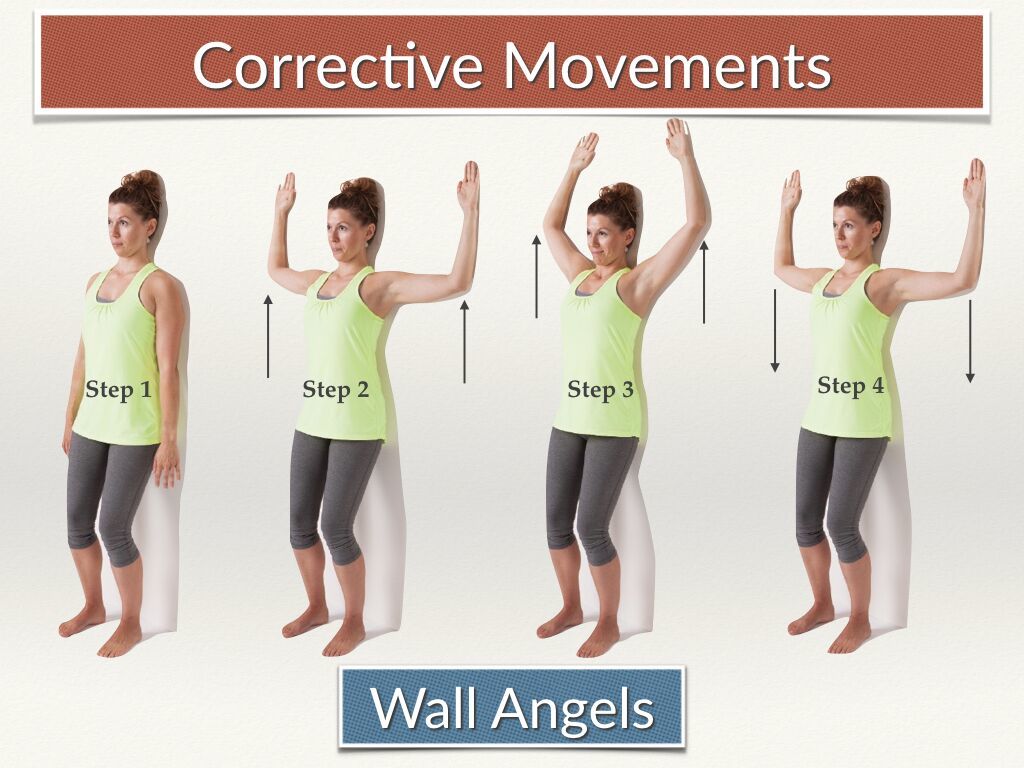
Step 1: Find Your Wall Position Stand with your back against a wall. Your head, shoulders, and butt should all touch the wall. Step your feet out about 4 inches from the wall base. This gives you the right angle to work with.
Step 2: Set Your Head Press the back of your head gently into the wall. Don’t force it. If your head won’t touch, that’s okay – you’re already seeing how much your posture has changed. Just get as close as you can without straining.
Step 3: Position Your Arms Raise your arms like you’re making a “W” shape. Your upper arms should be parallel to the floor. Your forearms point up at a 90-degree angle. Press your arms and hands flat against the wall.
Step 4: Engage Your Core Pull your belly button toward your spine. This stops your lower back from arching too much. You should feel your abs working but still be able to breathe normally.
Step 5: Start the Movement Slowly slide your arms up the wall. Keep your hands and arms pressed against the wall the whole time. Go as high as you can while maintaining contact with the wall.
Step 6: The Top Position Your arms should form a “Y” shape at the top. Hold this position for 5 seconds. You should feel your upper back muscles working hard. This is good – these muscles have been sleeping for years.
Step 7: Lower with Control Slowly slide your arms back down to the starting “W” position. Take 3 seconds to lower them. The slow movement makes your muscles work harder and builds better control.
Step 8: Repeat and Rest Do this 10 times total. Rest for 30 seconds between each set. You’ll do 4 sets of 10 reps. That’s your complete 2-minute posture reset.
Three Ways to Make It Harder (Or Easier)
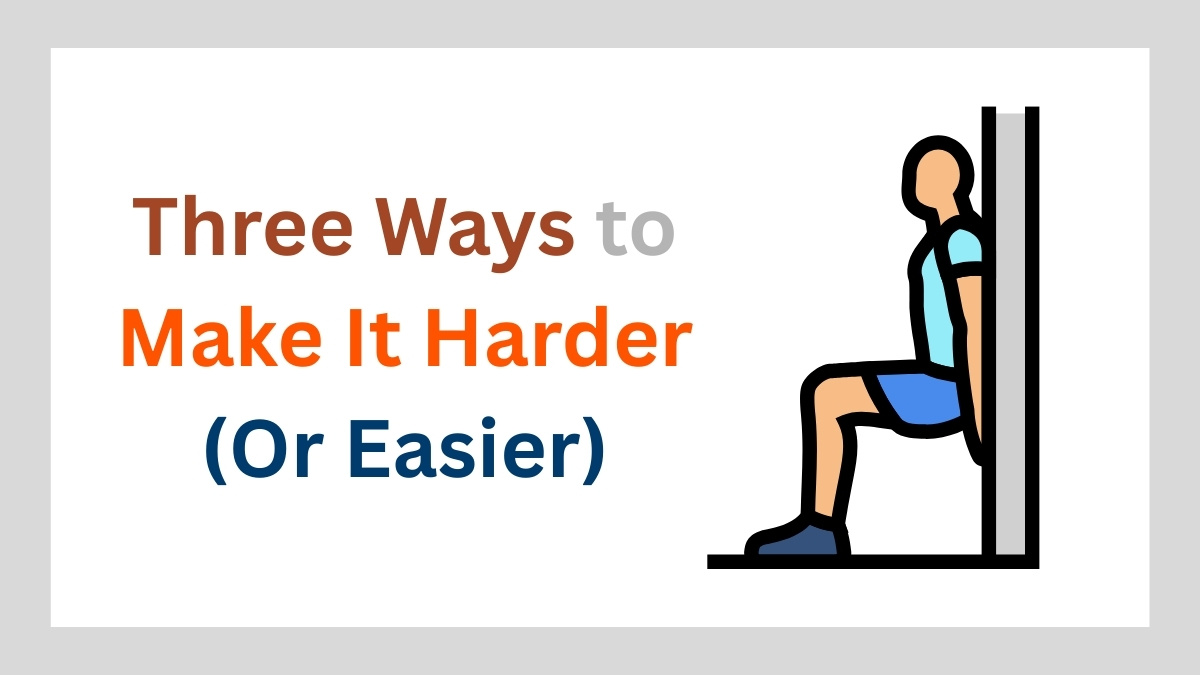
Beginner Level: Can’t keep your head or arms on the wall? Start here. Do the arm movements without touching the wall. Focus on the “W” to “Y” motion. This teaches your brain the movement pattern first.
Standard Level: This is the version above. Keep everything touching the wall throughout the movement. Most people should start here and master this level first.
Advanced Level: Add a small weight in each hand. Even 2-pound weights make this much harder. Or hold the top position for 10 seconds instead of 5. Only try this after 2 weeks of perfect standard form.
How to Know You’re Doing It Right
Your upper back should feel like it’s working hard. This might be new for you. These muscles have been weak for so long that even light work feels intense. That’s normal and good.
You should feel a stretch across your chest. This means you’re opening up the tight muscles from hunching forward. Some people feel this stretch immediately. Others need a few days of practice.
Your glutes should squeeze automatically when you press your back into the wall. If they don’t, think about pinching a coin between your cheeks. This wakes up the muscles that support your lower back.
Common Mistakes That Kill Results
Don’t arch your back to get your head on the wall. This defeats the purpose. It’s better to keep your head forward and work on improving it over time.
Don’t let your arms come off the wall during the movement. The moment they lift off, you lose the benefit. Go slower and don’t slide as high if you need to.
Don’t hold your breath. This exercise should feel challenging but not impossible. If you can’t breathe normally, you’re trying too hard too fast.
What This Exercise Actually Does
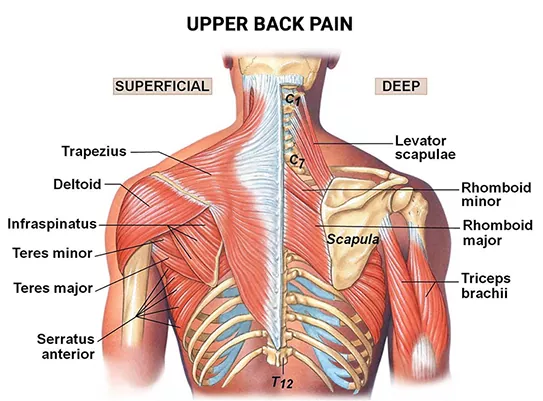
The wall angel activates your deep neck flexors – the muscles that pull your head back where it belongs. It strengthens your middle traps and rhomboids – the muscles between your shoulder blades that pull your shoulders back. And it fires up your glutes – the muscles that should be supporting your spine all day.
This combination fixes the exact muscle imbalances that sitting creates. Your tight chest muscles get stretched. Your weak back muscles get stronger. Your sleepy glutes wake up and remember their job.
The best part? Your body learns this new pattern fast. After just a few days, you’ll notice yourself sitting up straighter without thinking about it. Your muscles start remembering how to hold you up correctly.
Your 5-Step Daily Protocol (Maximum Results in Minimum Time)
You know the exercise. But when should you actually do it? Most people try these office worker stretches once and forget about them. That’s why their posture never changes. Here’s the exact system that gets real results.
The magic number is every 2 hours while you work. Your body starts locking up after 90 minutes of sitting. By hitting the 2-hour mark, you stop the damage before it sets in. This keeps your muscles active and your spine happy all day long.
Don’t worry about being perfect. Missing a session won’t ruin everything. But the more consistent you are, the faster you’ll see changes in how you feel and look.
Step 1: Set Your Reminders (Do This Once)
Put 4 alarms on your phone during work hours. Label them “Posture Break.” Set them for 10 AM, 12 PM, 2 PM, and 4 PM. This covers your full workday without being annoying.

Most people skip this step and rely on memory. That never works. Your brain is focused on work, not on sitting posture exercises. The reminders do the thinking for you.
If alarms feel disruptive, try a gentle vibrating watch or a simple phone notification. The key is making it automatic so you don’t have to remember.
Step 2: The Perfect Timing Method
Do your wall angels right when the alarm goes off. Don’t wait “just 5 more minutes” to finish your email. That 5 minutes turns into an hour, and you skip the whole session.

Stand up immediately and walk to the nearest wall. This movement alone starts waking up your muscles before you even begin the exercise.
The whole process takes 2 minutes from alarm to sitting back down. That’s less time than checking social media. And the energy boost you get makes you more productive for the next 2 hours.
Step 3: Master Your Breathing
Breathe in through your nose as you slide your arms up the wall. Breathe out through your mouth as you lower them down. This rhythm keeps you relaxed and helps your muscles work properly.

Hold your breath at the top for 2 seconds, then exhale slowly. This isn’t about holding your breath as long as possible. It’s about staying calm while your muscles work.
If you find yourself gasping or breathing fast, you’re trying too hard. Slow down the movement and focus on smooth, controlled breathing.
Step 4: Track Your Wins (Not Your Failures)

Week 1: Notice how the exercise feels easier each day. Your arms might touch the wall better by Friday than they did on Monday.
Week 2: Pay attention to how you feel between sessions. Do you notice yourself sitting up straighter? Does your neck feel less tight at lunch?
Week 3: Take a photo of your side profile. Compare it to a photo from before you started. Most people are shocked at how much their head position improves in just 3 weeks.
Step 5: Level Up Your Practice
Beginner Modification: Can’t do it 4 times a day yet? Start with just 2 times – once mid-morning and once mid-afternoon. Build the habit first, then add more sessions.
Intermediate Challenge: Add a 30-second hold at the top position during your lunch session. This makes your back muscles work harder when you have more time.
Advanced Version: Do 2 sets of 10 reps during each session instead of just 1 set. This doubles your muscle activation without taking much extra time.
Your Sample Daily Schedule

10 AM: Wall angels after your first coffee break 12 PM: Wall angels before or after lunch
2 PM: Wall angels during your afternoon slump 4 PM: Wall angels to prep for the drive home
This schedule works with natural energy dips and keeps you feeling strong all day. Adjust the times to fit your schedule, but keep the 2-hour spacing.
Quick Troubleshooting Guide
Arms won’t stay on the wall? Your chest is too tight. Do the movement slower and don’t go as high until your flexibility improves.
Lower back hurts during the exercise? You’re arching too much. Engage your abs more and take smaller steps away from the wall.

Feel nothing in your upper back? Press harder into the wall and squeeze your shoulder blades together as you move. Wake up those sleepy muscles.
The key to making this work is treating it like brushing your teeth. You don’t skip brushing because you’re busy. You don’t negotiate with yourself about whether you feel like it. You just do it because it’s part of taking care of yourself.
Final Thought:
You now know the truth about what sitting does to your body. Every hour in that chair curves your spine, weakens your muscles, and ages you faster than time itself. But you also know the solution.
One exercise fixes it all. The wall angel targets every muscle that sitting destroys. It opens your chest, strengthens your back, and wakes up your glutes. All in 2 minutes against any wall.

This isn’t about perfect posture or looking like a fitness model. This is about feeling good in your own body again. It’s about standing up without that sharp pain in your lower back. It’s about not needing to crack your neck every hour just to feel normal.
The best chair exercise for posture is the one you actually do. And now you have a system that makes it automatic. Every 2 hours, find a wall, do your angels, and give your spine what it needs.
Your body has been waiting for this reset. It wants to heal itself. You just need to give it 2 minutes every few hours to remember how to hold you up correctly.
Try the wall angel right now—stand up, find a wall, and give your spine the reset it deserves. Your future self will thank you for starting today.