This 10-Minute “Bone-Proofing” Workout Is Going Viral (See Why Everyone’s Doing It!)

You’ve probably seen the “bone-proofing” workout trending online. But is it just another fitness fad, or is there real science behind it? It’s a fair question, especially when you hear big promises.
Here is the hard truth. Our bodies start to lose bone density after age 35. This process speeds up a lot during and after menopause. It’s a silent problem you can’t see or feel, which is why it’s so easy to ignore.
This change puts many women at risk for osteopenia and osteoporosis. A simple fall could lead to a serious fracture. This is why building stronger bones now is so important.
This article breaks down the simple science behind this 10-minute “bone-proofing” workout. We will show you the 6 specific moves. We’ll also explain how jump training for bones actually works.

And we’ll provide the hard data to back it all up. This is a clear, actionable guide to help you increase bone density and build a stronger, more resilient body.
🦴 10-Minute Bone-Proofing Workout
Build stronger bones with science-backed jump training
High-impact jumping sends direct signals to your bones to build new, stronger tissue
101 women over 58 with low bone density tracked for 8 months
How it works: Impact from jumping creates mechanical force → Bone cells (osteocytes) detect force → Send biochemical “wake-up call” → Bone-building cells (osteoblasts) activate → New, stronger bone tissue forms
1-3
4-6
7+
Phase 1: Two-Feet Jumps
Build your foundation. Learn to jump and land safely. Don’t rush!
Add these ONLY when Phase 1 feels comfortable with no pain. Maximum force focus.
Most advanced phase. Single-leg work requires more balance and strength.
This workout is powerful but not for everyone. Always prioritize your safety.
👆 Click any exercise card to see detailed step-by-step instructions

It’s a hard fact: our bones start to lose strength after age 35. You can’t feel it happening, but it’s a key reason why a “bone-proofing” workout matters so much as you get older.
Think of your bones like a nonstop construction project. Your body has builders (osteoblasts) that create new bone and a cleanup crew (osteoclasts) that removes old bone. In your 30s, the builders start to slow down, but the cleanup crew keeps going.
This process speeds up a lot during menopause. The hormone estrogen helps keep this whole system in balance. When estrogen levels drop, bone loss happens much faster. Some women lose up to 20% of their bone density in the years around menopause.

This is why two-thirds of people with osteoporosis are women. It’s a silent problem until a fall causes a break. A smart osteoporosis workout helps you fight back. You are taking steps to increase bone density and stay strong for years to come.
The Science: How Jumping Actually Builds Bone
So how can jumping build bone? It’s not just any movement. This workout uses jump training for bones, which is a type of high-intensity impact.
This isn’t like a long, slow jog. It’s about short, powerful, and rapid movements. This quick impact is a “good” stress for your bones. We know this works because of real research. The 2018 “LIFTMOR” study gives us clear proof.
Researchers followed 101 women over 58 who already had low bone density. One group did light, basic exercises and ended up losing about 1% of their bone density over 8 months.
But the other group did high-intensity training, like squats, deadlifts, and jumping. They actually gained almost 3% bone density. This shows the right kind of stress works.
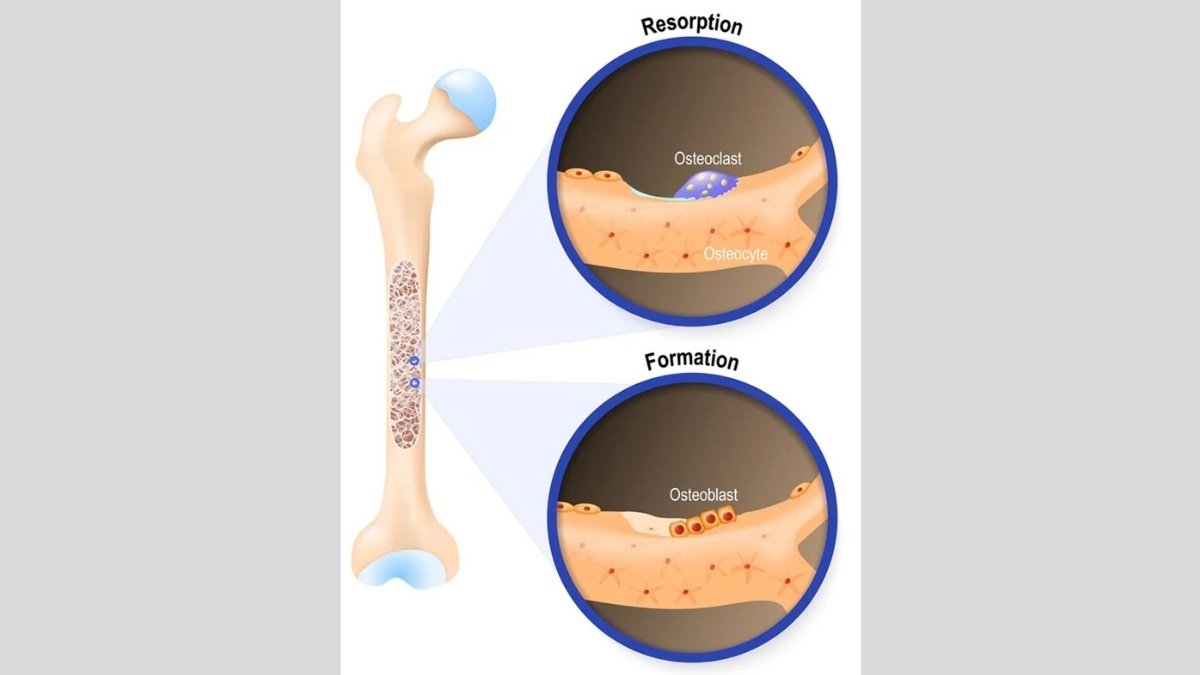
Here is what happens in your body. Dr. Vonda Wright, an orthopaedic surgeon, explains that the impact from jumping creates a mechanical force.
Your bone cells, called osteocytes, feel this force. This sends a biochemical signal, like a “wake-up call.” That signal tells your bone-building cells, the osteoblasts, to get to work. You are literally signaling your body to build new, stronger bone.
The 10-Minute “Bone-Proofing” Workout Plan
Here is the 10-minute “bone-proofing” workout plan. Strength coach Andy Vincent gives two simple rules for this routine. Do it a maximum of three times per week.

You can use it as a standalone 10-minute workout. Or, you can do it as a warm-up before your main strength session. The most important rule is to progress slowly. Your safety comes first, so do not try all six moves at once.
- Weeks 1-3: Start only with Phase 1 (Two-Feet Jumps).
- Weeks 4-6: If Phase 1 feels good and you have no pain, you can add Phase 2 (Higher-Impact Jumps).
- Weeks 7+: Once you are comfortable with the first two phases, add Phase 3 (Unilateral Jumps).
Here are the 6 moves, broken down by phase.
Phase 1: Two-Feet Jumps (Weeks 1-3)
This first phase builds your foundation. The goal here is to learn how to jump and land safely. Do not rush this phase.
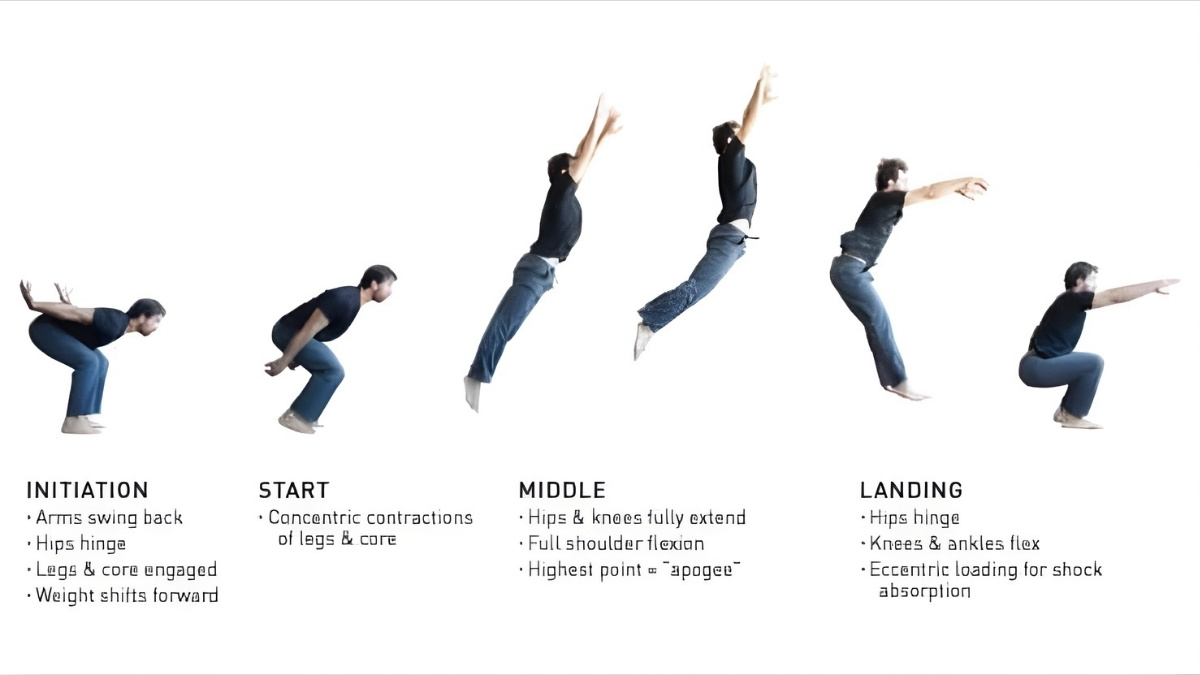
1. Squat Jump
- What it does: This move builds vertical, explosive power.
- How-to:
- Start standing with your feet shoulder-width apart.
- Lower into a squat, as if you are sitting in a chair. Keep your chest up. Let your arms come in front of you.
- From the bottom of the squat, explode straight up. Swing your arms back and then up to help you jump as high as you can.
- The landing is the most important part. Land softly on the balls of your feet, then let your heels touch down.
- Bend your knees and hips immediately to absorb the shock, sinking right back into the next squat.
- Reps/Sets: 3 sets of 4-8 reps. Rest 30-60 seconds between sets.
2. 180 Directional Jump
- What it does: This adds rotation. Changing direction is a key way to send signals to your bones from different angles.
- How-to:
- Stand with your feet a little wider than your shoulders. Bend your hips and knees slightly.
- Look straight ahead. Jump up, and while you are in the air, turn your head, hips, and feet 180 degrees.
- You will land facing the opposite direction.
- Land softly in the same “ready” position, with your knees bent.
- Pause for a second to get your balance, then jump back to where you started.
- Reps/Sets: 3 sets of 4-6 reps each way.
Phase 2: Higher-Impact Jumps (Weeks 4-6)
Only add these moves when Phase 1 feels comfortable and you have no pain. These jumps are about maximum force.
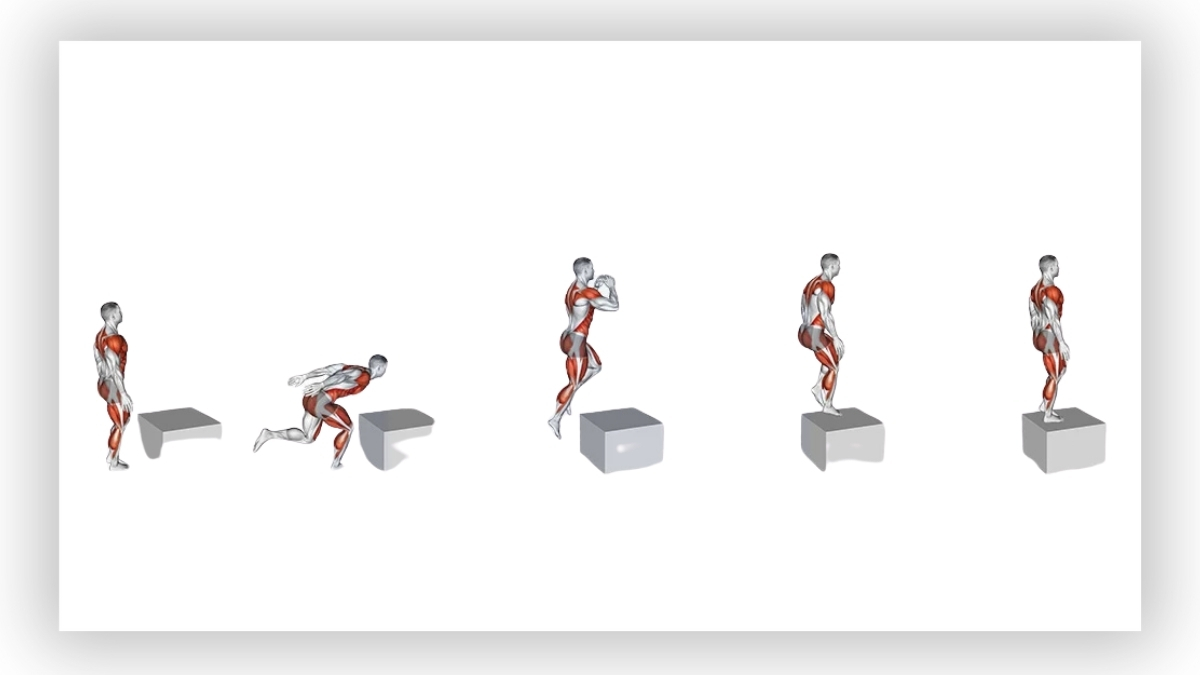
3. Broad Jump
- What it does: This builds horizontal power, jumping for distance.
- How-to:
- Get into a squat position. Swing your arms back behind you.
- In one powerful motion, swing your arms forward and jump as far forward as you can.
- Push off from your whole foot.
- Your goal is to land in a deep, stable squat. Bend your knees and hips to absorb the landing.
- Hold the landing for a second to make sure you are stable. Then, stand up, turn around, and reset.
- Reps/Sets: 4 sets of 2-4 reps.
4. Box Jump
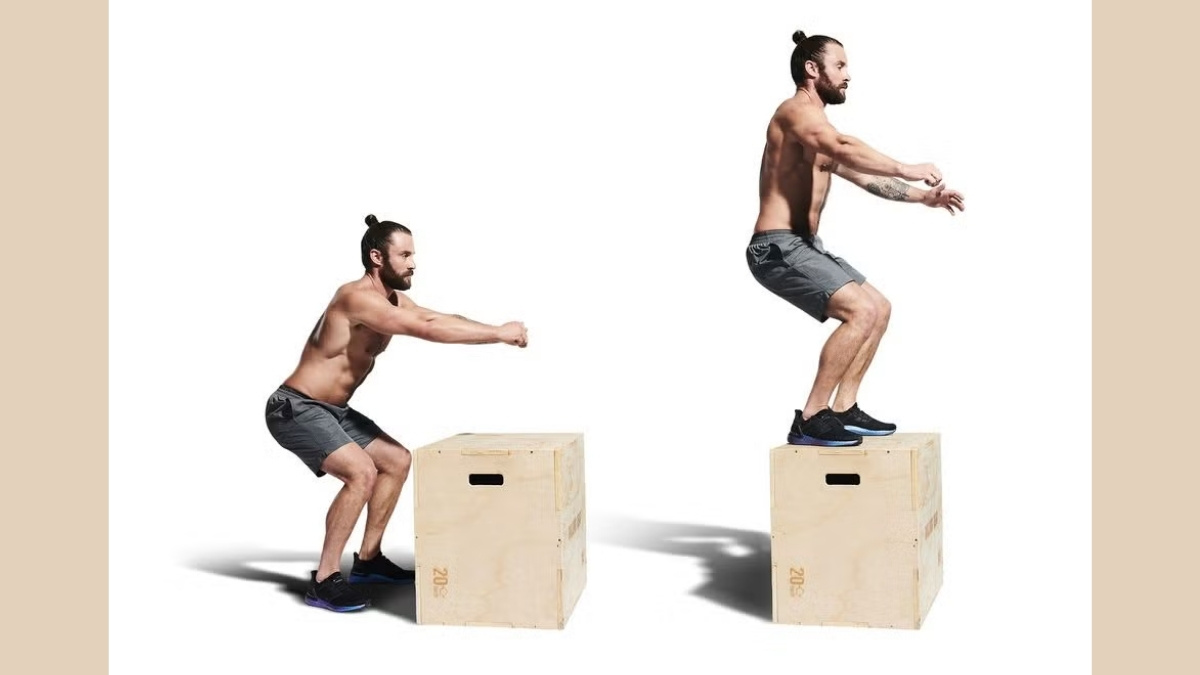
- What it does: This builds vertical power and teaches you how to land softly.
- How-to:
- Stand facing a low, sturdy plyo box. It cannot be a chair or anything that will tip over.
- Swing your arms back as you bend your knees.
- Explode up, swinging your arms forward.
- The goal is to land softly on top of the box in a squat position.
- This is the most important rule: STEP back down. Never jump down. Jumping off the box adds too much risk.
- Reps/Sets: 4 sets of 4-6 reps.
Phase 3: Unilateral Jumps (Weeks 7+)
This is the most advanced phase. You are now working one leg at a time. This requires more balance and strength.
5. Single-Leg Jump to Low Step
- What it does: This builds quick, single-leg power and coordination.
- How-to:
- Stand facing a low step or platform (about 6-8 inches high).
- Place your right foot on the step and your left foot on the floor. You’ll be in a small split-lunge position.
- In one quick, short hop, jump up and switch your feet in the air.
- You will land with your left foot on the step and your right foot on the floor.
- This should be a fast, controlled, “tap-tap” motion.
- Reps/Sets: 3 sets of 2-4 reps each side.
6. Bulgarian Split Squat Jump

- What it does: This is a very advanced move for single-leg power.
- How-to:
- Stand in front of a low bench. Place the top of your right foot on the bench behind you.
- Your left (front) foot should be far enough forward so you can lunge down.
- Lower down into a lunge until your back knee almost touches the floor.
- From the bottom, push hard through your front foot and jump straight up.
- Land softly on that same front foot, and immediately lower back into the lunge. This is very hard on your balance, so start small.
- Reps/Sets: 2 sets of 4-6 reps.
Who Needs to Be Cautious? (Important Safety Rules)
This high-impact workout is powerful. But that also means it is not the right starting point for everyone. Your safety is the top priority.

If you have diagnosed osteoporosis and are new to jump training, you must talk to your doctor. They can help you create a safe plan.
For pregnancy, coach Andy Vincent advises against starting this if you’ve never done it before. If you’re an experienced jumper, see a pelvic health specialist.
If you have a joint injury, Dr. Wright suggests a mini trampoline for less impact. Strength training is also a great alternative. It builds muscle, which pulls on bones and helps them indirectly.
Finally, if you experience incontinence, see a pelvic health specialist. Focus on strength training as your main osteoporosis workout in the meantime.
Conclusion:
This viral 10-minute “bone-proofing” workout is more than a trend. It’s a powerful tool, backed by science. Using high-impact jump training for bones, you can send a direct signal to your body to increase bone density.
Remember to start slow. Master Phase 1 before moving on, and always listen to your body. Protecting your bones is a marathon, not a sprint.
Are you ready to invest 10 minutes, three times a week, to build a stronger, more resilient future?